.
dbt - Data Build Tool

Transform, test, and document data in your warehouse
🚀 About
In this HashiQube DevOps lab, you'll get hands-on experience with dbt (Data Build Tool) - a transformation tool that enables data analysts and engineers to transform, test, and document data in cloud data warehouses.

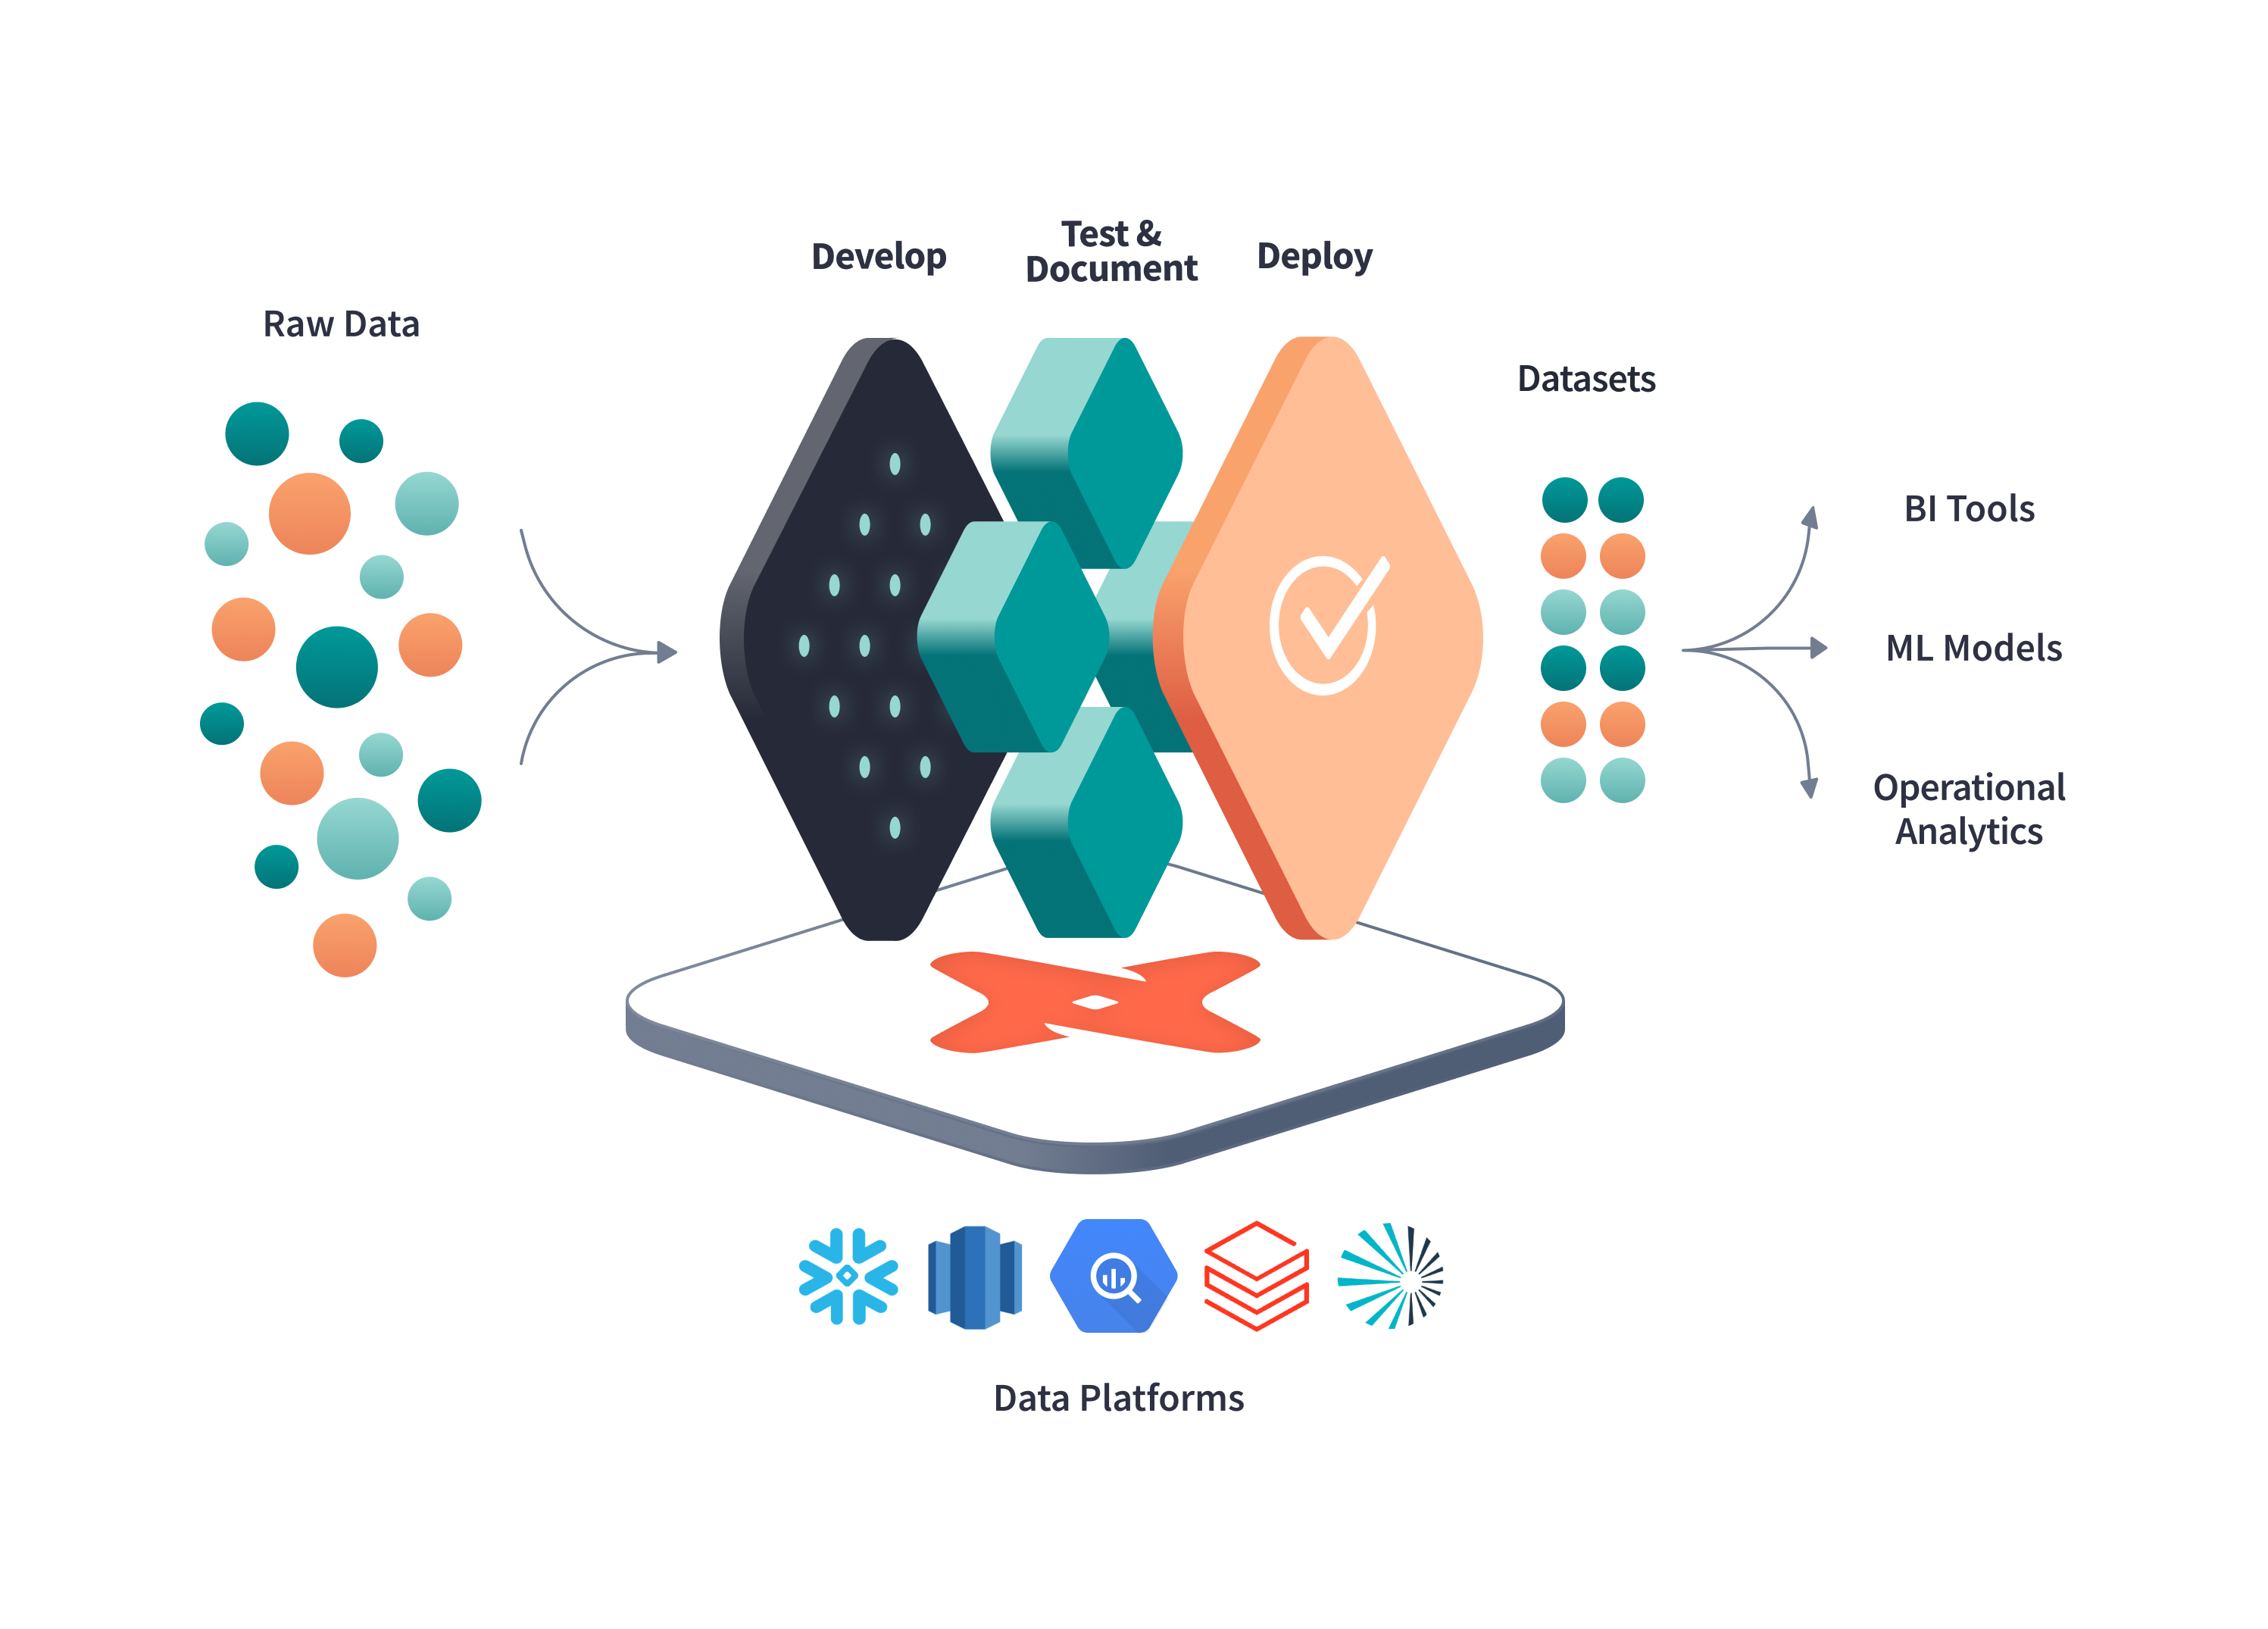
The modern analytics engineering workflow powered by dbt
📋 Getting Started
Before provisioning, review the dbt and adapter versions located in common.sh.
You can control which adapter and version you want to install with dbt by changing the DBT_WITH variable to one of these values:
DBT_WITH=postgres
# AVAILABLE OPTIONS:
# postgres - PostgreSQL adapter
# redshift - Amazon Redshift adapter
# bigquery - Google BigQuery adapter
# snowflake - Snowflake adapter
# mssql - SQL Server and Synapse adapter
# spark - Apache Spark adapter
# all - Install all adapters (excluding mssql)📥 Provision
vagrant up --provision-with basetools,docsify,docker,postgresql,dbtdocker compose exec hashiqube /bin/bash
bash hashiqube/basetools.sh
bash docker/docker.sh
bash docsify/docsify.sh
bash database/postgresql.sh
bash dbt/dbt.sh🧪 dbt Labs Example Project
The provisioner automatically sets up the Jaffle Shop example project from dbt Labs.
Running the Example
Run the Provision step above.
The example project from https://github.com/dbt-labs/jaffle_shop is already cloned into
/vagrant/dbt/jaffle_shop.Enter the HashiQube environment:
vagrant sshNavigate to the example project:
cd /vagrant/dbt/jaffle_shopExplore the project structure and follow the tutorial at https://github.com/dbt-labs/jaffle_shop#running-this-project.
💻 Using Your Own dbt Project
Enter HashiQube SSH session:
vagrant sshIf you have an existing dbt project under your home directory, you can access it via the
/osdatavolume, which is mapped to your home directory.Update your
profiles.ymlwith the correct credentials for your target database.Test your connection:
dbt debugRun your dbt project:
dbt run
🖥️ Web UI Access
Once provisioning is complete, you can access the dbt web interface:

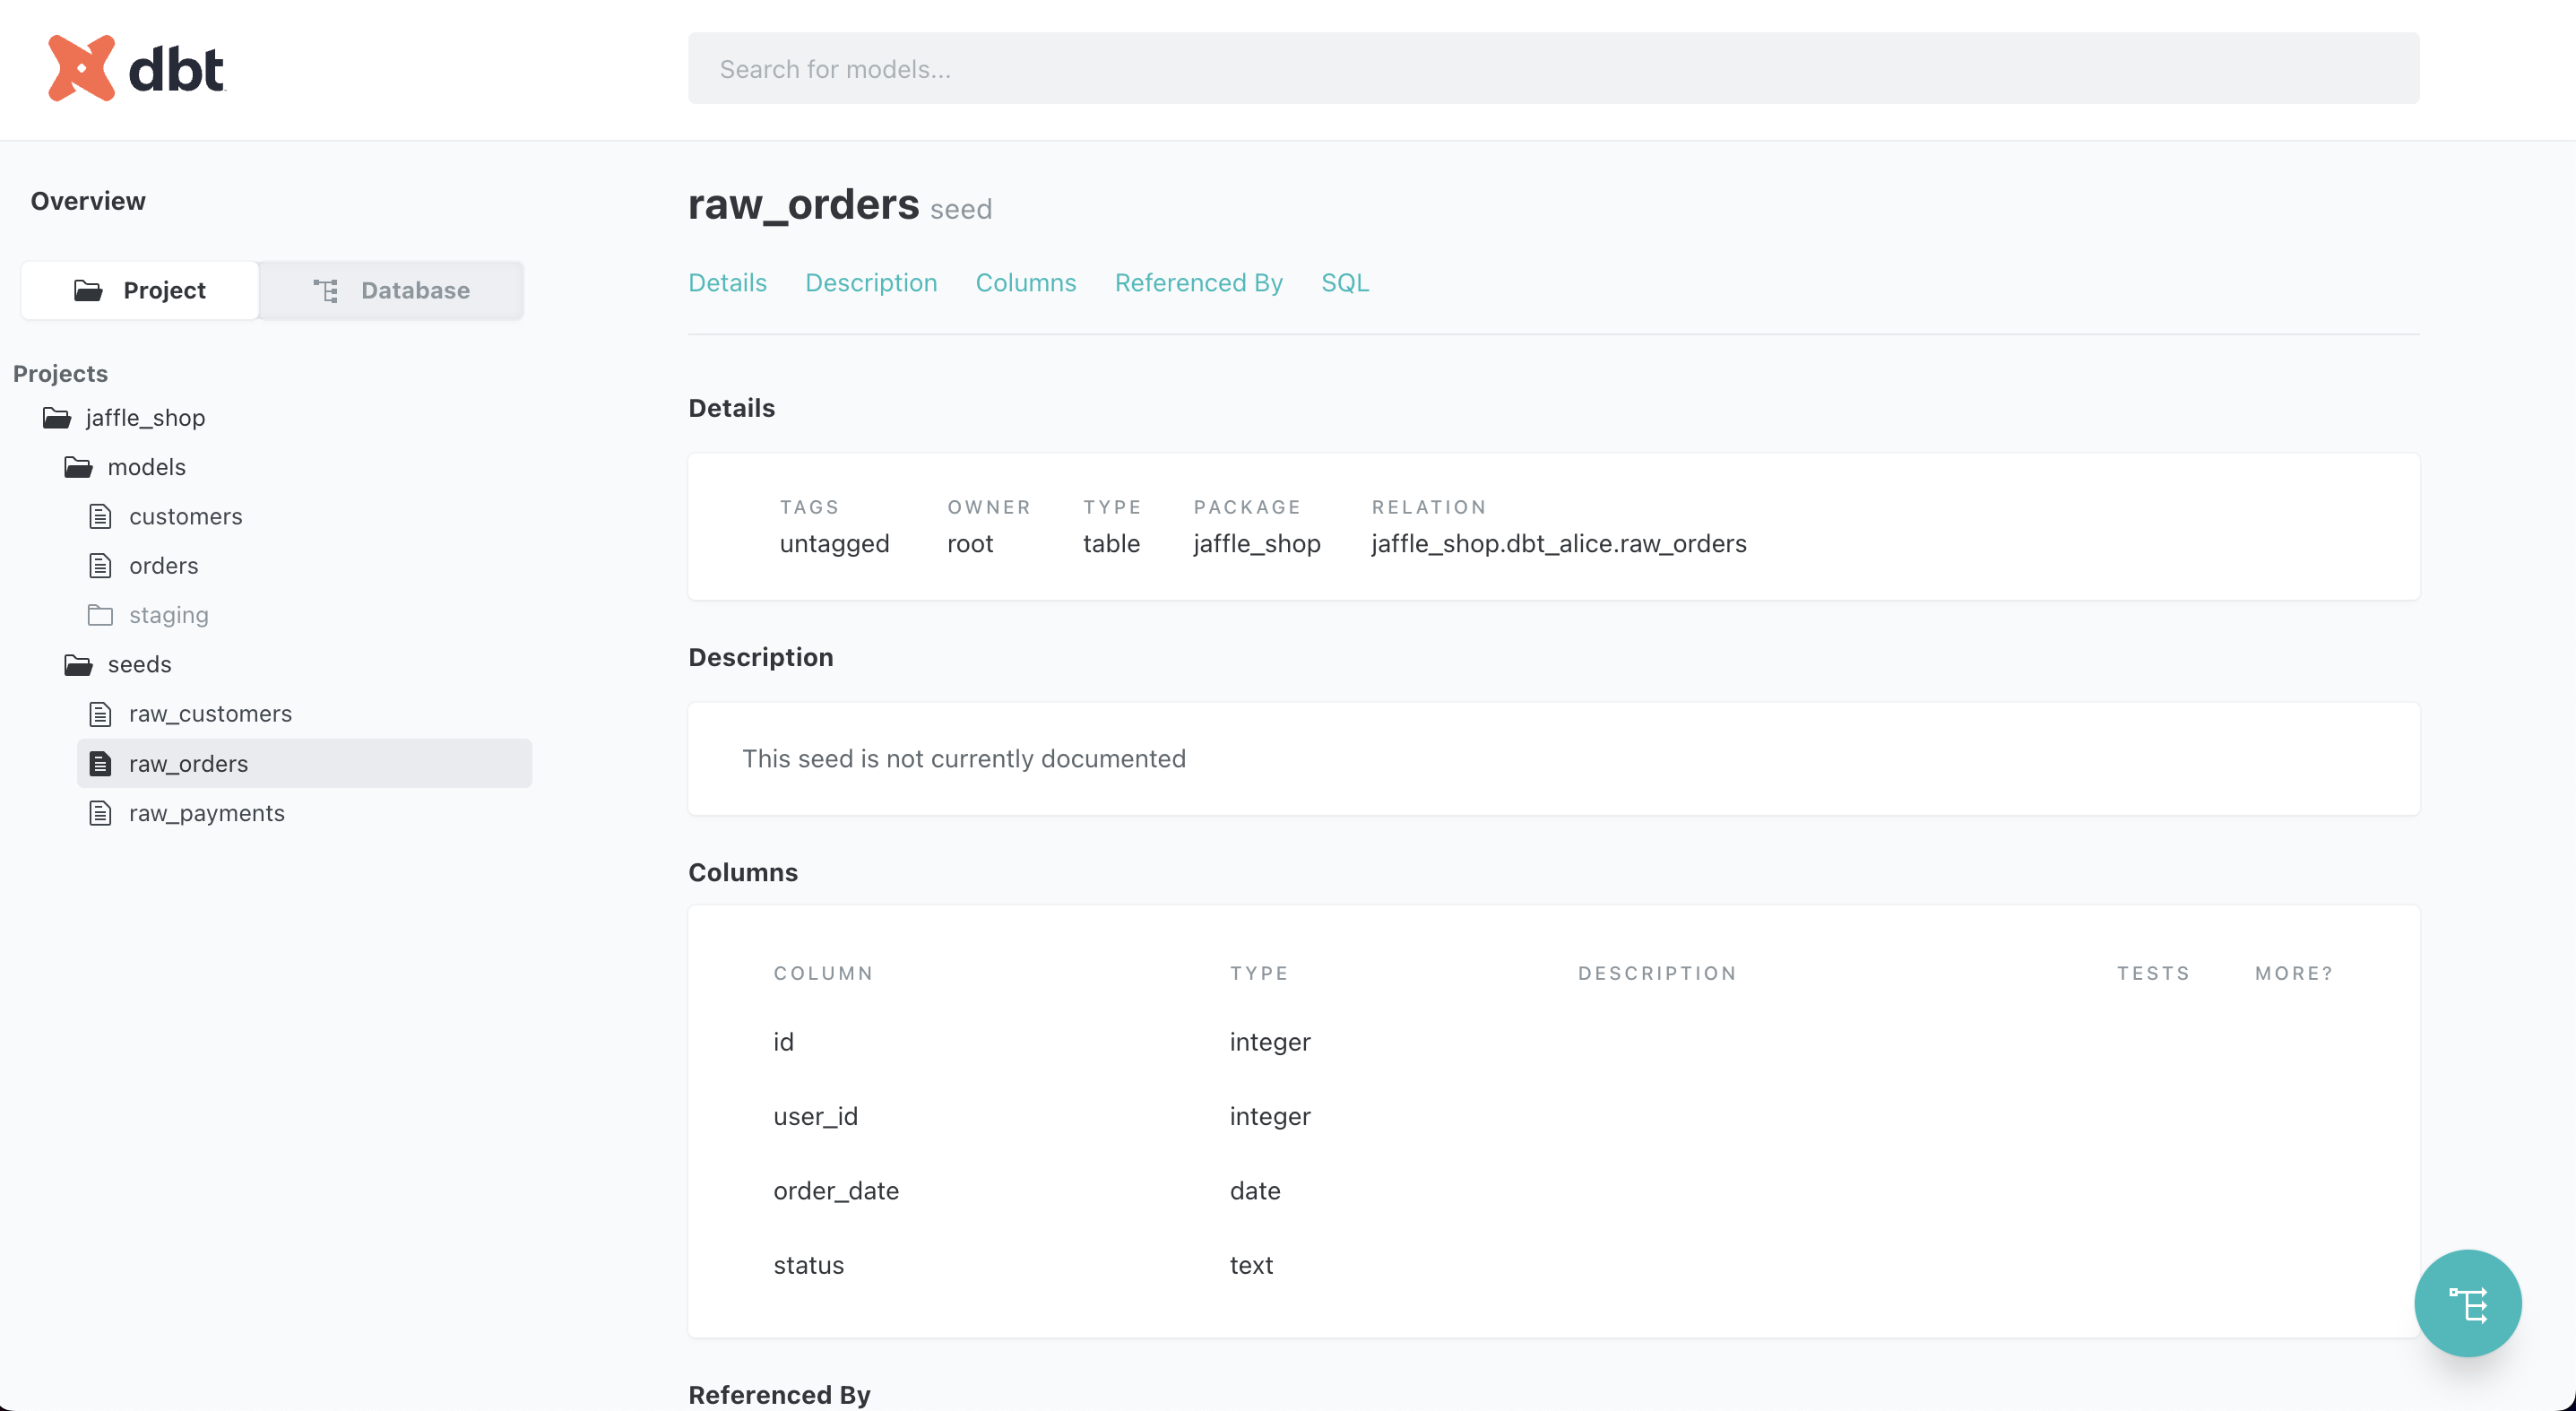
dbt project view showing models and structure

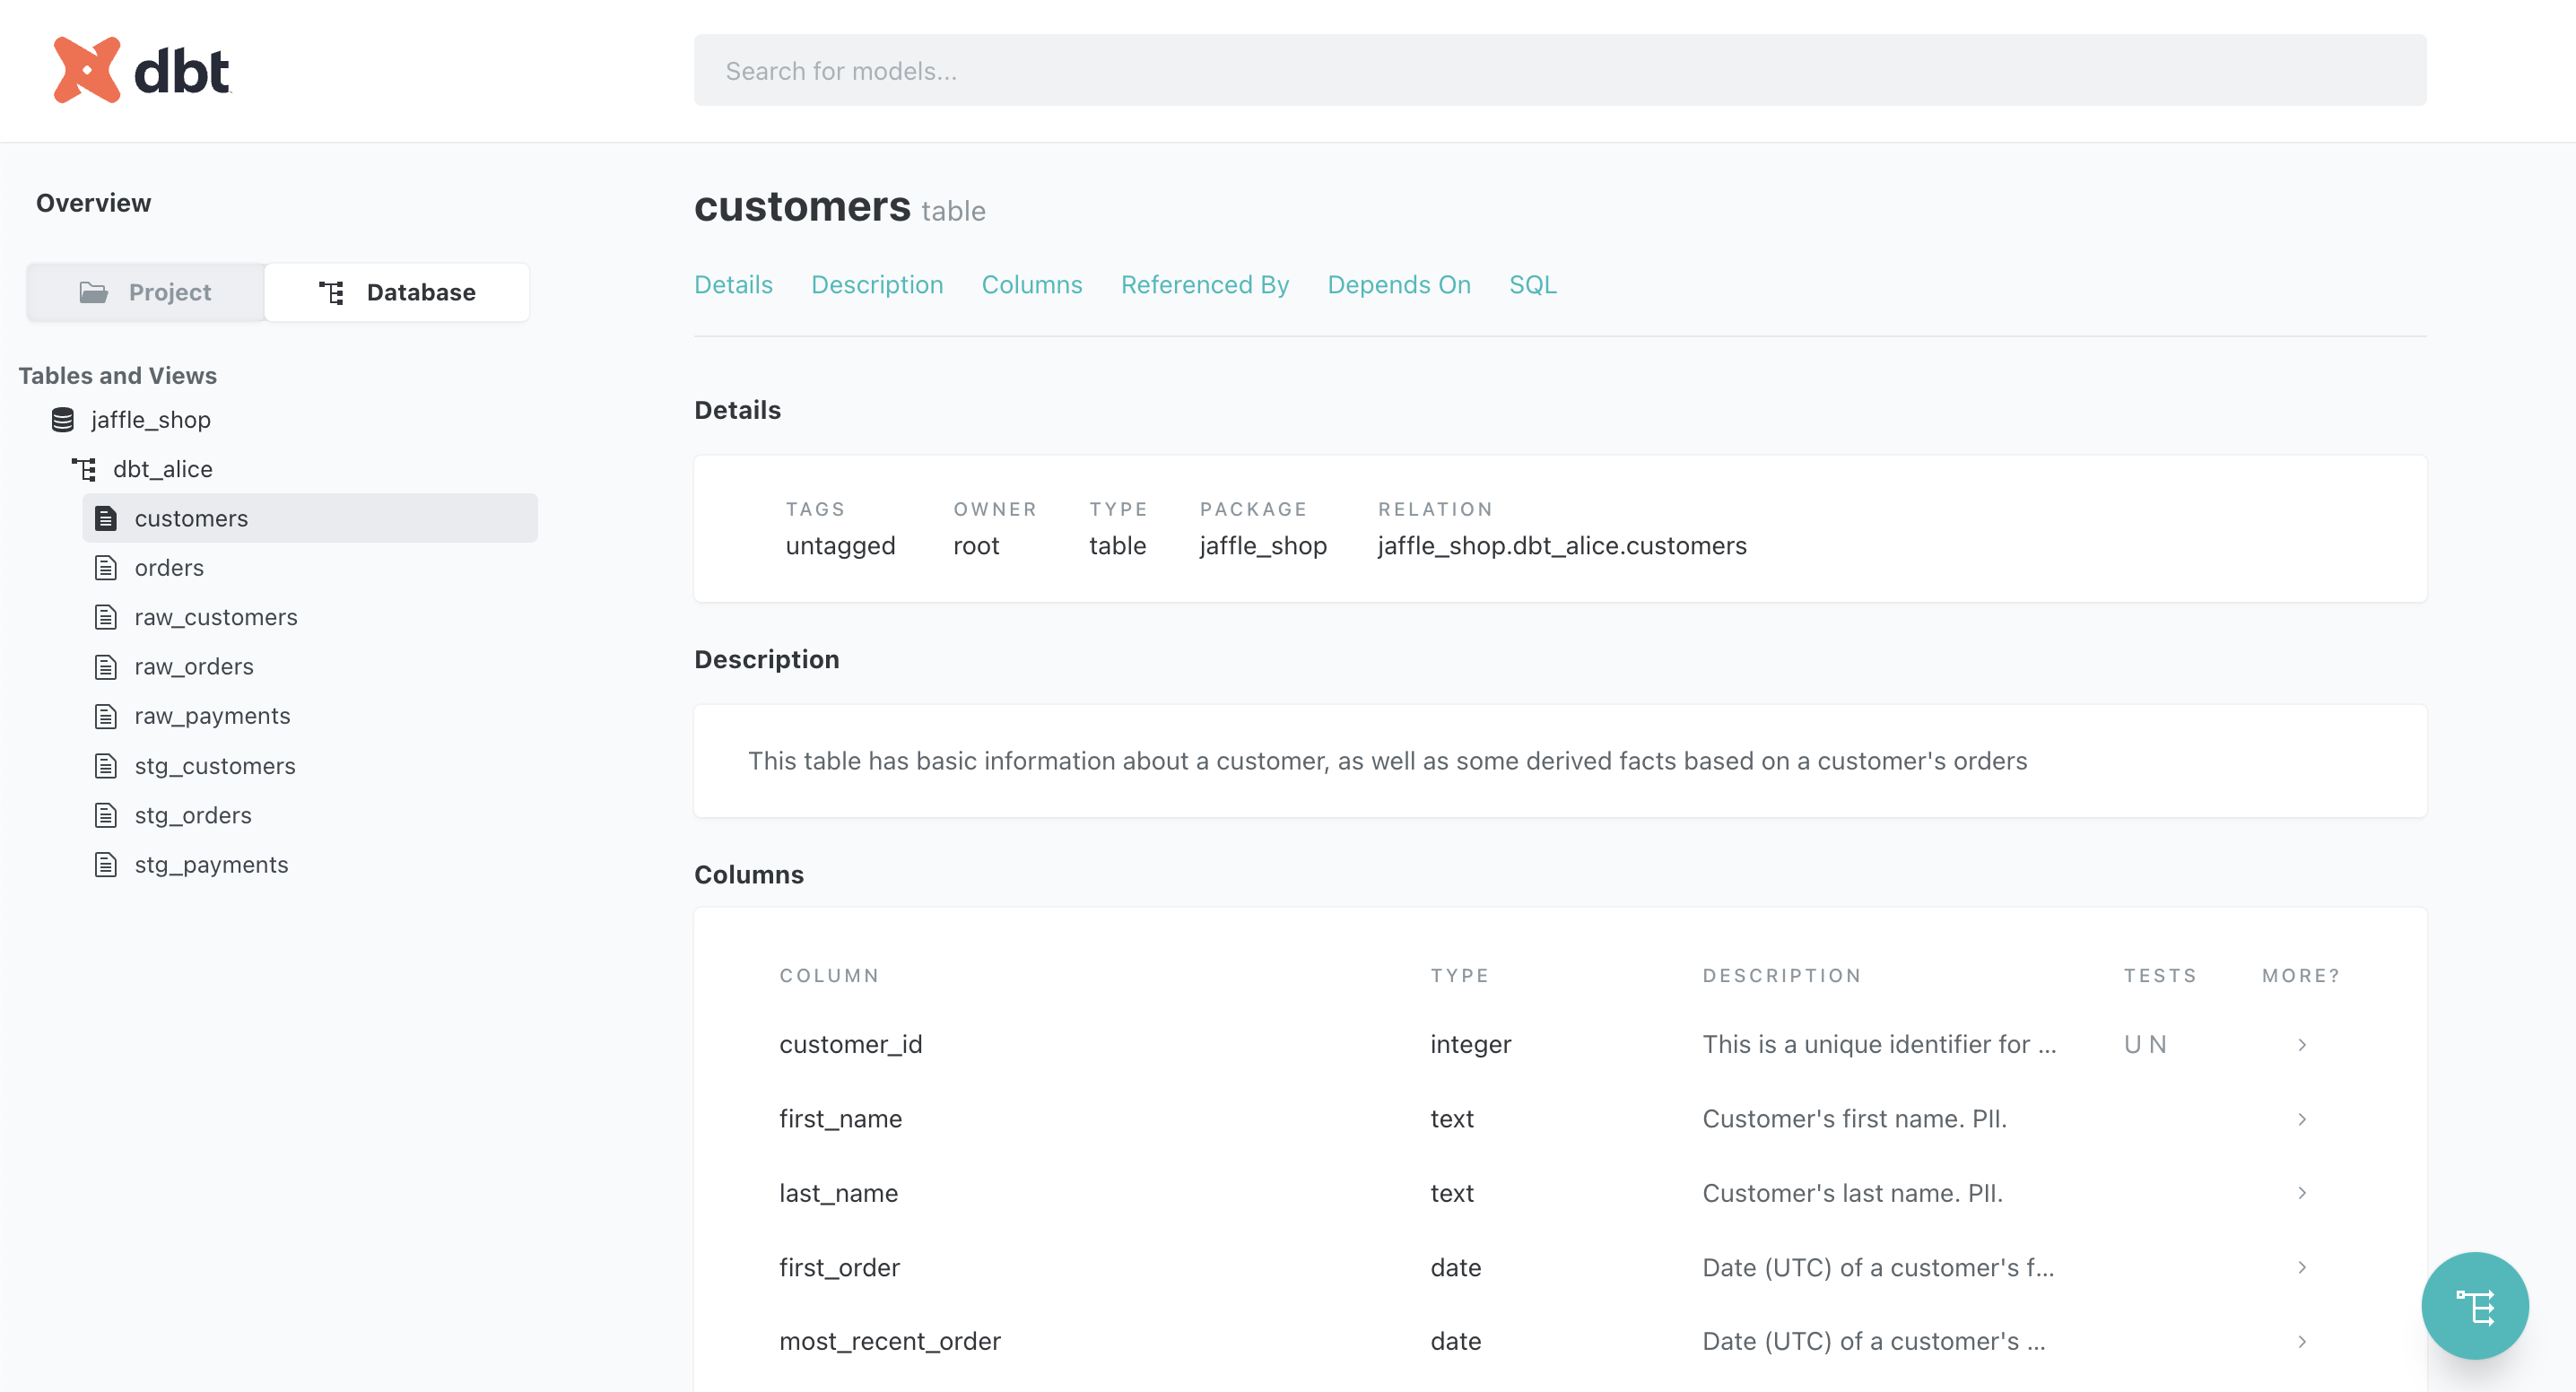
dbt database view showing tables and schemas

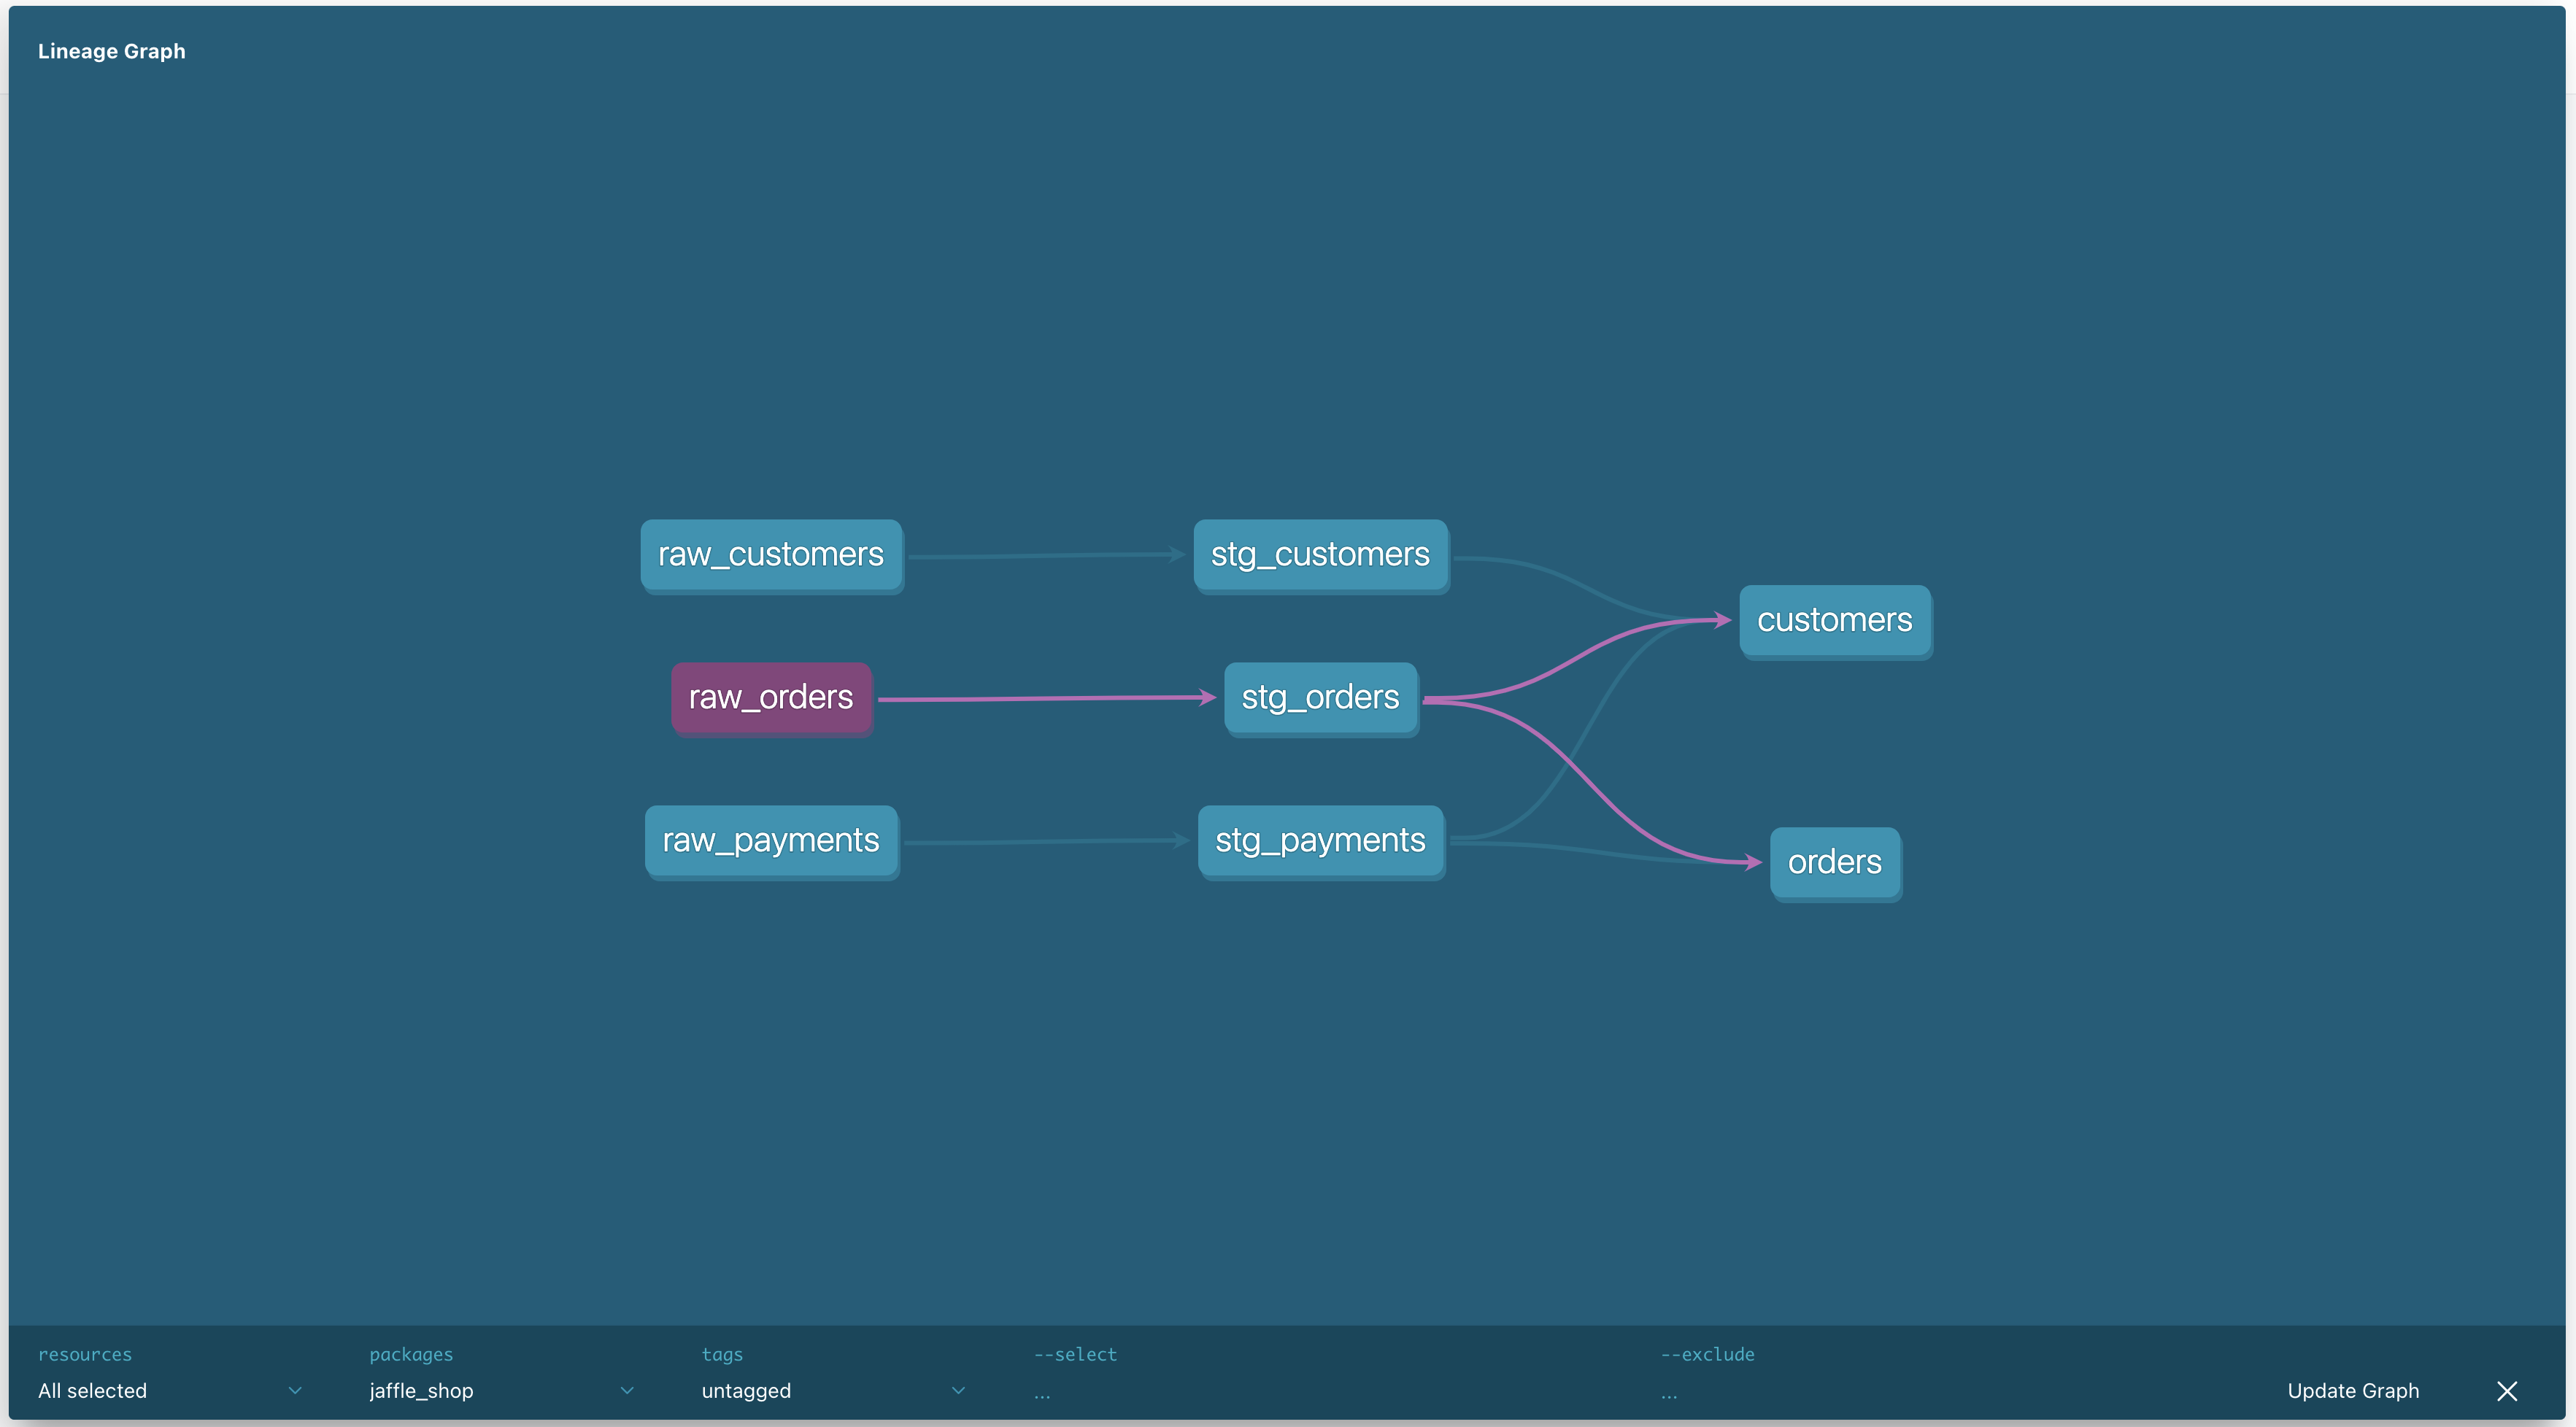
dbt lineage graph showing data transformation dependencies
🔌 Supported Database Adapters
dbt supports multiple database adapters, allowing you to connect to various data warehouses.
MSSQL and Synapse
These adapters require a specific version of dbt:
Core:
- installed: 1.1.0
- latest: 1.2.1 - Update available!
Plugins:
- postgres: 1.1.0 - Update available!
- synapse: 1.1.0 - Up to date!
- sqlserver: 1.1.0 - Up to date!Other Adapters
When using other adapters, you'll see something like:
Core:
- installed: 1.2.1
- latest: 1.2.1 - Up to date!
Plugins:
- spark: 1.2.0 - Up to date!
- postgres: 1.2.1 - Up to date!
- snowflake: 1.2.0 - Up to date!
- redshift: 1.2.1 - Up to date!
- bigquery: 1.2.0 - Up to date!💡 Performance Tips
As your dbt project grows, dbt run and dbt test commands can become time-consuming. Here are some optimization strategies:
Using Deferred Execution
Store artifacts to reuse in future runs:
# Run only new or modified models
dbt run --select [...] --defer --state path/to/artifacts
# Test only new or modified models
dbt test --select [...] --defer --state path/to/artifactsThis approach:
- Executes only what's new or changed in your code
- Reuses previously compiled artifacts
- Significantly reduces execution time for large projects
- Is perfect for CI/CD pipelines and pull request validation
🔧 Provisioner Scripts
The dbt environment is set up using these scripts:
common.sh
# Defined common parameters for dbt-core in this file
########################################
# DEFINE WHICH ADAPTER TO USE
DBT_WITH=postgres
# AVAILABLE OPTIONS ARE:
# postgres
# redshift
# bigquery
# snowflake
# mssql
# ^^ with mssql being SQL Server and Synapase
# spark
# all
# ^^ will install all adapters excluding mssql
########################################
dbt_postgres_ref=[email protected] # postgres adapter is part of core now
dbt_redshift_ref=[email protected]
dbt_bigquery_ref=[email protected]
dbt_snowflake_ref=[email protected]
dbt_spark_ref=[email protected]
dbt_databricks=1.2.1
######################################
# Are you targeting Synapse or MSSQL??
# dbt-core must be the same version as the adapter.
# Versions as per https://github.com/dbt-msft/dbt-sqlserver/
dbt_sqlserver=1.1.0
dbt_synapse=1.1.0
dbt-global.sh
#!/bin/bash
set -e
# Common arguments and functions.
source /vagrant/dbt/common.sh
############################
# installs the odbc drivers required and
# sets the pip versions for MSSQL
install-dbt-mssql () {
echo "Installing dbt core. Version: ${dbt_sqlserver}"
python -m pip install --break-system-packages --no-cache "git+https://github.com/dbt-labs/dbt-core@v${dbt_sqlserver}#egg=dbt-postgres&subdirectory=plugins/postgres"
# Install ODBC headers for MSSQL support
if ! [[ "18.04 20.04 22.04" == *"$(lsb_release -rs)"* ]];
then
echo "Ubuntu $(lsb_release -rs) is not currently supported.";
exit;
fi
# sudo su
sudo /bin/bash -c 'curl https://packages.microsoft.com/keys/microsoft.asc | apt-key add -'
sudo /bin/bash -c 'curl https://packages.microsoft.com/config/ubuntu/$(lsb_release -rs)/prod.list > /etc/apt/sources.list.d/mssql-release.list'
# exit
sudo apt-get update
sudo ACCEPT_EULA=Y apt-get install -y msodbcsql18 postgresql-client
# optional: for bcp and sqlcmd
sudo ACCEPT_EULA=Y apt-get install -y mssql-tools18 postgresql-client
echo 'export PATH="$PATH:/opt/mssql-tools18/bin"' >> ~/.bashrc
source ~/.bashrc
# optional: for unixODBC development headers
sudo apt-get install -y unixodbc-dev postgresql-client
pip install -U dbt-sqlserver==$dbt_sqlserver --break-system-packages
pip install -U dbt-synapse==$dbt_synapse --break-system-packages
}
#####################################
#####################################
# Install DBT with some non MSSQL adapters
function install-dbt () {
echo -e '\e[38;5;198m'"++++ installing postgres adapter"
python -m pip install --break-system-packages --no-cache dbt-postgres
}
#####################################
function install-dbt-redshift () {
echo -e '\e[38;5;198m'"++++ installing redshift adapater"
python -m pip install --break-system-packages --no-cache dbt-redshift
}
#####################################
function install-dbt-bigquery () {
echo -e '\e[38;5;198m'"++++ installing bigquery adapater"
python -m pip install --break-system-packages --no-cache dbt-bigquery
}
#####################################
function install-dbt-snowflake () {
echo -e '\e[38;5;198m'"++++ installing snowflake adapater"
python -m pip install --break-system-packages --no-cache dbt-snowflake
}
#####################################
function install-dbt-spark () {
echo -e '\e[38;5;198m'"++++ installing spark adapter"
python -m pip install --break-system-packages --no-cache dbt-spark
}
#####################################
function install-dbt-databricks () {
echo -e '\e[38;5;198m'"++++ installing databricks adapter"
python -m pip install --break-system-packages --no-cache dbt-databricks
}
############################
# Add vagrant .local folder to path if missing
if [[ ":$PATH:" == *":/home/vagrant/.local/bin:"* ]]; then
echo "PATH is correctly set"
else
echo "PATH is missing /home/vagrant/.local/bin, adding into PATH"
export PATH="$PATH:/home/vagrant/.local/bin"
fi
############################
# Cleanup any existing dbt packages.
[ $(pip list | grep dbt | wc -l) -gt 0 ] && pip list | grep dbt | xargs pip uninstall -y --break-system-packages
echo $DBT_WITH
DBT_WITH="${DBT_WITH:=postgres}"; echo $DBT_WITH
echo -e '\e[38;5;198m'"++++ "
echo -e '\e[38;5;198m'"++++ The chosen dbt adapter is ${DBT_WITH}"
echo -e '\e[38;5;198m'"++++ "
case $DBT_WITH in
postgres)
install-dbt
;;
redshift)
install-dbt-redshift
;;
bigquery)
install-dbt-bigquery
;;
snowflake)
install-dbt-snowflake
;;
spark)
install-dbt-spark
;;
mssql)
install-dbt-mssql
;;
databricks)
install-dbt-databricks
;;
all)
install-dbt
install-dbt-redshift
install-dbt-bigquery
install-dbt-snowflake
install-dbt-spark
install-dbt-snowflake
install-dbt-databricks
;;
#default to postgres
*)
install-dbt
;;
esac
dbt --version
echo -e '\e[38;5;198m'"++++ "
echo -e '\e[38;5;198m'"++++ dbt-core is ready with adapter ${DBT_WITH}. Installed at $(which dbt) which is now in your PATH, type 'dbt' to get started"
echo -e '\e[38;5;198m'"++++ "
echo -e '\e[38;5;198m'"++++ "
echo -e '\e[38;5;198m'"++++ Now let's use a practical example from DBT Labs - https://github.com/dbt-labs/jaffle_shop"
echo -e '\e[38;5;198m'"++++ "
echo -e '\e[38;5;198m'"++++ "
echo -e '\e[38;5;198m'"++++ Ensure Docker Daemon is running (Dependency)"
echo -e '\e[38;5;198m'"++++ "
if pgrep -x "dockerd" >/dev/null
then
echo -e '\e[38;5;198m'"++++ Docker is running"
else
echo -e '\e[38;5;198m'"++++ Ensure Docker is running.."
sudo bash /vagrant/docker/docker.sh
fi
echo -e '\e[38;5;198m'"++++ "
echo -e '\e[38;5;198m'"++++ Ensure postgresql-client is installed"
echo -e '\e[38;5;198m'"++++ "
sudo apt-get install -y postgresql-client libpq-dev
python3 -m pip install --break-system-packages --force-reinstall psycopg2==2.9.4
if pgrep -x "postgres" >/dev/null
then
echo -e '\e[38;5;198m'"++++ "
echo -e '\e[38;5;198m'"++++ Postgresql is running"
echo -e '\e[38;5;198m'"++++ "
else
echo -e '\e[38;5;198m'"++++ "
echo -e '\e[38;5;198m'"++++ Ensure Postgres is running.."
echo -e '\e[38;5;198m'"++++ "
sudo bash /vagrant/database/postgresql.sh
fi
echo -e '\e[38;5;198m'"++++ "
echo -e '\e[38;5;198m'"++++ Create database jaffle_shop"
echo -e '\e[38;5;198m'"++++ "
PGPASSWORD=rootpassword psql --username=root --host=localhost --port=5432 -c 'create database jaffle_shop' || true
echo -e '\e[38;5;198m'"++++ "
echo -e '\e[38;5;198m'"++++ Cloning https://github.com/dbt-labs/jaffle_shop into /vagrant/dbt/jaffle_shop"
echo -e '\e[38;5;198m'"++++ "
rm -rf /vagrant/dbt/jaffle_shop
git clone https://github.com/dbt-labs/jaffle_shop.git /vagrant/dbt/jaffle_shop
cd /vagrant/dbt
echo -e '\e[38;5;198m'"++++ "
echo -e '\e[38;5;198m'"++++ dbt init jaffle_shop"
echo -e '\e[38;5;198m'"++++ "
dbt init jaffle_shop
cd jaffle_shop
# https://docs.getdbt.com/dbt-cli/configure-your-profile#connecting-to-your-warehouse-using-the-command-line
echo -e '\e[38;5;198m'"++++ "
echo -e '\e[38;5;198m'"++++ creating /vagrant/dbt/jaffle_shop/profiles.yml for user $(whoami)"
echo -e '\e[38;5;198m'"++++ "
mkdir -p /home/vagrant/.dbt
cat <<EOF | tee /home/vagrant/.dbt/profiles.yml
# example profiles.yml file
# credentials comes from database/postgresql.sh
jaffle_shop:
target: dev
outputs:
dev:
type: postgres
host: localhost
user: root
password: rootpassword
port: 5432
dbname: jaffle_shop
schema: dbt_alice
threads: 4
EOF
cat /home/vagrant/.dbt/profiles.yml
echo -e '\e[38;5;198m'"++++ "
echo -e '\e[38;5;198m'"++++ dbt debug"
echo -e '\e[38;5;198m'"++++ "
sudo -u vagrant dbt debug
echo -e '\e[38;5;198m'"++++ "
echo -e '\e[38;5;198m'"++++ dbt seed"
echo -e '\e[38;5;198m'"++++ "
sudo -u vagrant dbt seed
echo -e '\e[38;5;198m'"++++ "
echo -e '\e[38;5;198m'"++++ dbt run"
echo -e '\e[38;5;198m'"++++ "
sudo -u vagrant dbt run
echo -e '\e[38;5;198m'"++++ "
echo -e '\e[38;5;198m'"++++ dbt test"
echo -e '\e[38;5;198m'"++++ "
sudo -u vagrant dbt test
echo -e '\e[38;5;198m'"++++ "
echo -e '\e[38;5;198m'"++++ dbt docs generate"
echo -e '\e[38;5;198m'"++++ "
sudo -u vagrant dbt docs generate
echo -e '\e[38;5;198m'"++++ "
echo -e '\e[38;5;198m'"++++ dbt docs serve"
echo -e '\e[38;5;198m'"++++ "
if pgrep -x "dbt" >/dev/null
then
sudo kill -9 $(pgrep dbt)
fi
sudo -u vagrant nohup dbt docs serve --port 28080 > /vagrant/dbt/jaffle_shop/logs/dbt-docs-serve.log 2>&1 &
sh -c 'sudo tail -f /vagrant/dbt/jaffle_shop/logs/dbt-docs-serve.log | { sed "/Press Ctrl+C to exit/ q" && kill $$ ;}' || true
echo -e '\e[38;5;198m'"++++ "
echo -e '\e[38;5;198m'"++++ You can now access the DBT Doc Server at http://localhost:28080/#!/overview"
echo -e '\e[38;5;198m'"++++ Documentation can be found at http://localhost:3333/#/dbt/README"
echo -e '\e[38;5;198m'"++++ "


