
.
Ansible
![]()
About
In this HashiQube DevOps Lab you will learn about Ansible. What it is and how to use it. Further down below I provide you with an Example Ansible Role that runs on all operating systems, and has Molecule built in.
Ansible is a Configuration in Code system. It can do a lot of things for you. Enjoy this hands on DevOps Lab!
Ansible is an open-source software provisioning, configuration management, and application-deployment tool. It runs on many Unix-like systems, and can configure both Unix-like systems as well as Microsoft Windows. It includes its own declarative language to describe system configuration in YAML.
Molecule
Molecule project is designed to aid in the development and testing of Ansible roles and can speed up local development of Ansible roles and playbooks in magnetude!
Molecule provides support for testing with multiple instances, operating systems and distributions, virtualization providers, test frameworks and testing scenarios.
Molecule encourages an approach that results in consistently developed roles that are well-written, easily understood and maintained.
Molecule supports only the latest two major versions of Ansible (N/N-1), meaning that if the latest version is 2.9.x, we will also test our code with 2.8.x.
Ansible Tasks
When Ansible is executed it uses site.yml as the entry point, this simply points it to the tasks directory.
Because Ansible can operate on Windows, Linux (Deb and RPM based) systems, it's wise to split the tasks up to make it more readable.
Main.yml
Let's first look at the main.yml
As you can see below we are using Ansible Facts to direct the different Operating Systems to their own Task file.
---
- include: el.yml
when: >
(ansible_facts['distribution'] == "RedHat"
and ansible_facts['distribution_major_version'] == "8")
or
(ansible_facts['distribution'] == "RedHat"
and ansible_facts['distribution_major_version'] == "7")
or
(ansible_facts['distribution'] == "CentOS"
and ansible_facts['distribution_major_version'] == "8")
or
(ansible_facts['distribution'] == "CentOS"
and ansible_facts['distribution_major_version'] == "7")
- include: deb.yml
when: >
(ansible_facts['distribution'] == "Ubuntu"
and ansible_facts['distribution_major_version'] == "22")
or
(ansible_facts['distribution'] == "Ubuntu"
and ansible_facts['distribution_major_version'] == "20")
or
(ansible_facts['distribution'] == "Ubuntu"
and ansible_facts['distribution_major_version'] == "18")
or
(ansible_facts['distribution'] == "Debian"
and ansible_facts['distribution_major_version'] == "10")
or
(ansible_facts['distribution'] == "Debian"
and ansible_facts['distribution_major_version'] == "9")
- include: windows.yml
when: >
(ansible_facts['distribution_major_version'] == "10"
and ansible_facts['distribution'] is match("Microsoft Windows Server 2022.*"))
or
(ansible_facts['distribution_major_version'] == "10"
and ansible_facts['distribution'] is match("Microsoft Windows Server 2019.*"))
or
(ansible_facts['distribution_major_version'] == "10"
and ansible_facts['distribution'] is match("Microsoft Windows Server 2016.*"))
or
(ansible_facts['distribution_major_version'] == "6"
and ansible_facts['distribution'] is match("Microsoft Windows Server 2012.*"))
Enterprise Linux
Let's have a look at Enterprise Linux (RPM YUM based) el.yml
---
# if you want to list all variables for this host, uncomment this
#- name: "Ansible | List all known variables and facts"
# debug:
# var: hostvars[inventory_hostname]
# verbosity: 1
# set custom facts which we can use later on
- set_fact:
cloud: "google"
when:
ansible_facts['system_vendor'] == 'Google'
- set_fact:
cloud: "azure"
when:
ansible_facts['system_vendor'] == 'Microsoft Corporation'
- set_fact:
cloud: "amazon"
when:
ansible_facts['system_vendor'] == 'Xen'
- set_fact:
cloud: "vagrant"
when:
ansible_facts['system_vendor'] == 'innotek GmbH'
- name: "Cloud"
debug:
msg: "Cloud: {{ cloud }}"
- name: "OS"
debug:
msg: "{{ ansible_distribution }} {{ ansible_distribution_version }} {{ ansible_distribution_release }} on {{ cloud }}"
- name: "Write Ansible hostvars to file"
copy:
content: "{{ hostvars[inventory_hostname] }}"
dest: /build-{{ version_number }}.json
mode: "0644"
# WARNING!! This is just a POC normally we would not enter a password in clear text
- name: Ensure user ansible is present
ansible.builtin.user:
name: ansible
password: "{{ 'aix1rii3Bahshuleikei5y'|password_hash('sha512') }}"
# password: "$6$IBULZeGd6UP6Jkg3$QqdevUQs.VDuMnT8prurhLuz3PErfoUHXg0/culpF4uj8RdZJ7UyuOG9LAz2B16Nao1jFe5X.NIKw0eYBKyXO1"
update_password: on_create
comment: Ansible Tower
uid: 1040
shell: /bin/bash
groups: users,sudo
append: yes
tags:
- day0
# https://fedoraproject.org/wiki/EPEL#Quickstart
# we dont have a Redhat Subscription Manager or Satelite Server so we use EPEL
# we use the URL to the RPM, because dnf and yum cannot find the epel repo
- name: "Enable EPEL Repository"
yum:
name: "https://dl.fedoraproject.org/pub/epel/epel-release-latest-{{ ansible_facts['distribution_major_version'] }}.noarch.rpm"
state: present
disable_gpg_check: yes
ignore_errors: true
# rpm -ql epel-release
# dnf repository-packages epel list
# dnf repolist -v
- name: "Ensure package manager repositories are configured | Get repo list"
command: dnf repolist
changed_when: false
failed_when: false
register: dnf_configured
check_mode: no
args:
warn: false
# - name: "Ensure package manager repositories are configured | Display repo list"
# debug:
# msg:
# - "Alert! Below are the configured repos. Please review and make sure all allign with site policy"
# - "{{ dnf_configured.stdout_lines }}"
- name: "Get repo files list "
command: ls -l /etc/yum.repos.d/
register: ls_l_etc_yum_dot_repos_dot_d
- name: "Ensure package manager repositories are configured | Display repo list"
debug:
msg:
- "Alert! Below are the configured repos. Please review and make sure all allign with site policy"
- "{{ ls_l_etc_yum_dot_repos_dot_d.stdout_lines }}"
- name: "Install Package dependencies"
dnf:
name: "{{ item }}"
state: present
with_items:
- aide
- ipset
- firewalld
ignore_errors: true
when:
(ansible_facts['system_vendor'] == 'Xen'
and ansible_facts['distribution'] == "RedHat"
and ansible_facts['distribution_major_version'] == "8")
# amazon-ebs.redhat-83: TASK [/Users/riaannolan/workspace/servian.com/soe-image-factory/ansible/RHEL8-CIS : SCORED | 1.4.1 | PATCH | Ensure AIDE is installed | Install AIDE] ***
# amazon-ebs.redhat-83: fatal: [none]: FAILED! => {"changed": false, "failures": ["No package aide available."], "msg": "Failed to install some of the specified packages", "rc": 1, "results": []}
# amazon-ebs.redhat-83: failed: [none] (item=firewalld) => {"ansible_loop_var": "item", "changed": false, "failures": ["No package firewalld available."], "item": "firewalld", "msg": "Failed to install some of the specified packages", "rc": 1, "results": []}
# amazon-ebs.redhat-83: TASK [/Users/riaannolan/workspace/servian.com/soe-image-factory/ansible/RHEL8-CIS : SCORED | 3.4.1.1 | PATCH | Ensure a Firewall package is installed] ***
# amazon-ebs.redhat-83: fatal: [none]: FAILED! => {"changed": false, "failures": ["No package firewalld available."], "msg": "Failed to install some of the specified packages", "rc": 1, "results": []}
# FIX RHEL8-CIS SCORED | 1.4.1 | PATCH | Ensure AIDE is installed
# FIX RHEL8-CIS SCORED | 3.4.1.1 | PATCH | Ensure a Firewall package is installed
- name: "FIX RHEL8-CIS SCORED | 1.4.1 | PATCH | Ensure X is installed"
yum:
name: "{{ item }}"
state: present
disable_gpg_check: yes
with_items:
- http://mirror.centos.org/centos/8/AppStream/x86_64/os/Packages/aide-0.16-14.el8.x86_64.rpm
when:
(ansible_facts['system_vendor'] == 'innotek GmbH'
and ansible_facts['distribution'] == "RedHat"
and ansible_facts['distribution_major_version'] == "8")
ignore_errors: true
- name: "FIX RHEL7-CIS AUTOMATED | 1.4.1 | PATCH | Ensure X is installed"
yum:
name: "{{ item }}"
state: present
disable_gpg_check: yes
with_items:
- http://mirror.centos.org/centos/7/os/x86_64/Packages/aide-0.15.1-13.el7.x86_64.rpm
when:
(ansible_facts['system_vendor'] == 'innotek GmbH'
and ansible_facts['distribution'] == "RedHat"
and ansible_facts['distribution_major_version'] == "7")
ignore_errors: trueDebian/Ubuntu Linux
Let's have a look at Debian/Ubuntu Linux (DEB based) deb.yml
---
#- name: "Ansible | List all known variables and facts"
# debug:
# var: hostvars[inventory_hostname]
# verbosity: 1
- name: OS
debug:
msg: "{{ ansible_distribution }} {{ ansible_distribution_version }} {{ ansible_distribution_release }} on {{ ansible_facts['system_vendor'] }}"
tags:
- always
- name: VM Name and IP
debug:
msg: "vm_name: {{ vm_name }} vm_ip: {{ vm_ip }}"
tags:
- always
- set_fact:
cloud: "google"
when:
ansible_facts['system_vendor'] == 'Google'
tags:
- always
- set_fact:
cloud: "azure"
when:
ansible_facts['system_vendor'] == 'Microsoft Corporation'
tags:
- always
- set_fact:
cloud: "amazon"
when:
ansible_facts['system_vendor'] == 'Xen'
tags:
- always
- set_fact:
cloud: "vagrant"
when:
ansible_facts['system_vendor'] == 'innotek GmbH'
tags:
- always
- name: Write Ansible hostvars to file
copy:
content: "{{ hostvars[inventory_hostname] }}"
dest: /build-{{ version_number }}.json
mode: "0644"
tags:
- day0
# WARNING!! This is just a POC normally we would not enter a password in clear text
- name: Ensure user ansible is present
ansible.builtin.user:
name: ansible
password: "{{ 'aix1rii3Bahshuleikei5y'|password_hash('sha512') }}"
# password: "$6$IBULZeGd6UP6Jkg3$QqdevUQs.VDuMnT8prurhLuz3PErfoUHXg0/culpF4uj8RdZJ7UyuOG9LAz2B16Nao1jFe5X.NIKw0eYBKyXO1"
update_password: on_create
comment: Ansible Tower
uid: 1040
shell: /bin/bash
groups: users,sudo
append: yes
tags:
- day0
- name: Update apt repo and cache
apt:
update_cache: yes
force_apt_get: yes
cache_valid_time: 3600
tags:
- day1
- name: Upgrade all packages
apt:
upgrade: dist
force_apt_get: yes
tags:
- day1Windows
Let's have a look at Windows windows.yml
---
#- name: "Ansible | List all known variables and facts"
# debug:
# var: hostvars[inventory_hostname]
# verbosity: 1
- name: OS
debug:
msg: "{{ ansible_distribution }} on {{ ansible_facts['system_vendor'] }}"
- set_fact:
cloud: "google"
when:
ansible_facts['system_vendor'] == 'Google'
- set_fact:
cloud: "azure"
when:
ansible_facts['system_vendor'] == 'Microsoft Corporation'
- set_fact:
cloud: "amazon"
when:
ansible_facts['system_vendor'] == 'Xen'
- set_fact:
cloud: "vagrant"
when:
ansible_facts['system_vendor'] == 'innotek GmbH'
- name: Get OS System Info
ansible.windows.win_shell: "systeminfo | findstr /B 'OS'"
register: windows_systeminfo
- debug: var=windows_systeminfo.stdout_lines
- name: Write Ansible hostvars to file
copy:
content: "{{ hostvars[inventory_hostname] }}"
dest: C:/build-{{ version_number }}.json
mode: "0644"
#
- name: DEBUG - print hostvars
ansible.windows.win_shell: type C:/soe-{{ version_number }}.json
register: hostvarsPrinter
- debug: var=hostvarsPrinter.stdout_lines
# Create Ansible user for Tower
- name: Ensure user ansible is present
ansible.windows.win_user:
name: ansible
password: "aix1rii3Bahshuleikei5y"
update_password: always
state: present
groups:
- Users
- Administrators
#- name: Create win_update log folder
# ansible.windows.win_file:
# path: C:\ansible_win_update_logs
# state: directory
#
#- name: Windows Update
# ansible.windows.win_updates:
# category_names:
# - Application
# - Connectors
# - CriticalUpdates
# - DefinitionUpdates
# - DeveloperKits
# - FeaturePacks
# - Guidance
# - SecurityUpdates
# - ServicePacks
# - Tools
# - UpdateRollups
# - Updates
# - Upgrades
# reboot: yes
# log_path: C:\ansible_win_update_logs\ansible_win_update.txt
#- name: DEBUG - print win_update log
# ansible.windows.win_shell: type C:\ansible_win_update_logs\ansible_win_update.txt
# register: winUpdatePrinter
#- debug: var=winUpdatePrinter.stdout_lines
#- name: OS_disk
# win_shell: Get-PSDrive
# register: os_disk
#
#- debug: var=os_disk.stdout_lines
#
#- name: OS_memory
# debug:
# msg: "{{ ansible_memtotal_mb }}"
#
#- name: OS_service
# win_shell: Get-Service | Where-Object {$_.Status -EQ "Running"}
# register: os_services
# ignore_errors: true
#
#- debug: var=os_services.stdout_lines
#
#- name: OS_server_DNS
# win_shell: Get-DnsClientServerAddress
# register: server_DNS
# ignore_errors: true
#
#- debug: var=server_DNS.stdout_lines
#
#- name: Check if Windows Defendender is running
# win_shell: Get-ItemProperty -Path "HKLM:\SOFTWARE\Policies\Microsoft\Windows Defender"
# register: WindowsDefenderStatus
# ignore_errors: true
#
#- debug: var=WindowsDefenderStatus.stdout_lines
#
#- name: OS_Domain
# win_shell: Get-WmiObject Win32_ComputerSystem
# register: os_domain
# ignore_errors: true
#
#- debug: var=os_domain.stdout_lines
#
#- name: Run net localgroup Administrators
# win_shell: net localgroup Administrators
# register: net_localgroup_Administrators
# ignore_errors: true
#
#- debug: var=net_localgroup_Administrators.stdout_lines
#
#- name: "Allow Remote Desktop Protocol (rdp) connections"
# win_shell: "New-NetFirewallRule -Name rdp -DisplayName 'Remote Desktop Protocol (rdp)' -Enabled True -Direction Inbound -Protocol TCP -Action Allow -LocalPort 3389"
# ignore_errors: true
#
#- name: "Run netstat /p tcp /a | findstr 3389"
# win_shell: "netstat /p tcp /a | findstr 3389"
# register: netstat_findstr_3389
# ignore_errors: true
#
#- debug: var=netstat_findstr_3389.stdout_lines
#
#- name: "Allow OpenSSH Server (sshd) connections"
# win_shell: "New-NetFirewallRule -Name sshd -DisplayName 'OpenSSH Server (sshd)' -Enabled True -Direction Inbound -Protocol TCP -Action Allow -LocalPort 22"
# ignore_errors: true
#
#- name: "Run netstat /p tcp /a | findstr 22"
# win_shell: "netstat /p tcp /a | findstr 22"
# register: netstat_findstr_22
# ignore_errors: true
#
#- debug: var=netstat_findstr_22.stdout_lines
- name: "Run Get-LocalUser | Select *"
win_shell: "Get-LocalUser | Select *"
register: get_local_user
ignore_errors: true
- debug: var=get_local_user.stdout_lines
Molecule example
Using Molecule, we can quickly test our Role or Playbook against many Operating Systems.
In our Ansible Role Example Role which supports Redhat, Centos, Ubuntu, Debian and Windows we have an example Molecule YAML file
---
#
# Molecule using Vagrant + Virtualbox so we can test playbooks on Linux and Windows
#
#galaxy_info:
# role_name: ansible_role_example_role
dependency:
name: galaxy
driver:
name: vagrant
provider:
name: virtualbox
lint: |
set -e
ansible-lint tasks/main.yml
platforms:
- name: ansible-role-example-role-centos-83
box: bento/centos-8.3
memory: 512
cpus: 1
config_options:
ssh.keep_alive: yes
ssh.remote_user: "'vagrant'"
ssh.password: "'vagrant'"
interfaces:
- network_name: forwarded_port
guest: 22
host: 3221
provision: true
state: up
groups:
- linux
- name: ansible-role-example-role-centos-77
box: bento/centos-7.7
memory: 256
cpus: 1
config_options:
ssh.keep_alive: yes
ssh.remote_user: "'vagrant'"
ssh.password: "'vagrant'"
interfaces:
- network_name: forwarded_port
guest: 22
host: 3222
provision: true
state: up
groups:
- linux
- name: ansible-role-example-role-debian-10
box: bento/debian-10
memory: 512
cpus: 1
config_options:
ssh.keep_alive: yes
ssh.remote_user: "'vagrant'"
ssh.password: "'vagrant'"
interfaces:
- network_name: forwarded_port
guest: 22
host: 3223
provision: true
state: up
groups:
- linux
- name: ansible-role-example-role-debian-9
box: bento/debian-9
memory: 512
cpus: 1
config_options:
ssh.keep_alive: yes
ssh.remote_user: "'vagrant'"
ssh.password: "'vagrant'"
interfaces:
- network_name: forwarded_port
guest: 22
host: 3224
provision: true
state: up
groups:
- linux
- name: ansible-role-example-role-ubuntu-2204
box: bento/ubuntu-22.04
memory: 1024
cpus: 1
config_options:
ssh.keep_alive: yes
ssh.remote_user: "'vagrant'"
ssh.password: "'vagrant'"
interfaces:
- network_name: forwarded_port
guest: 22
host: 3225
provision: true
groups:
- linux
- name: ansible-role-example-role-windows-2019
box: jborean93/WindowsServer2019
memory: 1024
cpus: 1
config_options:
vm.communicator: "'winrm'"
winrm.remote_user: "'vagrant'"
winrm.password: "'vagrant'"
interfaces:
- network_name: forwarded_port
guest: 5986
host: 59970
provision: true
groups:
- windows
- name: ansible-role-example-role-ubuntu-2004
box: bento/ubuntu-20.04
memory: 512
cpus: 1
config_options:
ssh.keep_alive: yes
ssh.remote_user: "'vagrant'"
ssh.password: "'vagrant'"
interfaces:
- network_name: forwarded_port
guest: 22
host: 3226
provision: true
state: up
groups:
- linux
- name: ansible-role-example-role-ubuntu-1804
box: bento/ubuntu-18.04
memory: 512
cpus: 1
config_options:
ssh.keep_alive: yes
ssh.remote_user: "'vagrant'"
ssh.password: "'vagrant'"
interfaces:
- network_name: forwarded_port
guest: 22
host: 3227
provision: true
state: up
groups:
- linux
- name: ansible-role-example-role-redhat-83
box: generic/rhel8
memory: 512
cpus: 1
config_options:
ssh.keep_alive: yes
ssh.remote_user: "'vagrant'"
ssh.password: "'vagrant'"
interfaces:
- network_name: forwarded_port
guest: 22
host: 3228
provision: true
state: up
groups:
- linux
- name: ansible-role-example-role-redhat-79
box: generic/rhel7
memory: 512
cpus: 1
config_options:
ssh.keep_alive: yes
ssh.remote_user: "'vagrant'"
ssh.password: "'vagrant'"
interfaces:
- network_name: forwarded_port
guest: 22
host: 3229
provision: true
state: up
groups:
- linux
- name: ansible-role-example-role-windows-2016
box: jborean93/WindowsServer2016
memory: 1024
cpus: 1
config_options:
vm.communicator: "'winrm'"
winrm.remote_user: "'vagrant'"
winrm.password: "'vagrant'"
interfaces:
- network_name: forwarded_port
guest: 5986
host: 59967
provision: true
state: up
groups:
- windows
provisioner:
name: ansible
connection_options:
ansible_ssh_user: vagrant
log: true
inventory:
host_vars:
ansible-role-example-role-windows-2019:
ansible_become: false
ansible_user: vagrant
ansible_password: vagrant
ansible_port: 59970
ansible_host: 127.0.0.1
ansible_connection: winrm
ansible_winrm_scheme: https
ansible_winrm_server_cert_validation: ignore
ansible-role-example-role-ubuntu-2204:
ansible_connection: ssh
ansible_port: 3225
ansible_user: vagrant
ansible_password: vagrant
ansible_host: 127.0.0.1
ansible-role-example-role-centos-83:
ansible_connection: ssh
ansible_port: 3221
ansible_user: vagrant
ansible_password: vagrant
ansible_host: 127.0.0.1
ansible-role-example-role-centos-77:
ansible_connection: ssh
ansible_port: 3222
ansible_user: vagrant
ansible_password: vagrant
ansible_host: 127.0.0.1
ansible-role-example-role-debian-10:
ansible_connection: ssh
ansible_port: 3223
ansible_user: vagrant
ansible_password: vagrant
ansible_host: 127.0.0.1
ansible-role-example-role-debian-9:
ansible_connection: ssh
ansible_port: 3224
ansible_user: vagrant
ansible_password: vagrant
ansible_host: 127.0.0.1
ansible-role-example-role-ubuntu-2004:
ansible_connection: ssh
ansible_port: 3225
ansible_user: vagrant
ansible_password: vagrant
ansible_host: 127.0.0.1
ansible-role-example-role-ubuntu-1804:
ansible_connection: ssh
ansible_port: 3226
ansible_user: vagrant
ansible_password: vagrant
ansible_host: 127.0.0.1
ansible-role-example-role-redhat-83:
ansible_connection: ssh
ansible_port: 3227
ansible_user: vagrant
ansible_password: vagrant
ansible_host: 127.0.0.1
ansible-role-example-role-redhat-79:
ansible_connection: ssh
ansible_port: 3228
ansible_user: vagrant
ansible_password: vagrant
ansible_host: 127.0.0.1
ansible-role-example-role-windows-2016:
ansible_become: false
ansible_user: vagrant
ansible_password: vagrant
ansible_port: 59967
ansible_host: 127.0.0.1
ansible_connection: winrm
ansible_winrm_scheme: https
ansible_winrm_server_cert_validation: ignore
group_vars:
linux:
ansible_become: true
windows:
ansible_become_user: Administrator
ansible_become_method: runas
lint:
name: ansible-lint
scenario:
name: default
converge_sequence:
- create
- converge
verifier:
name: ansible
Practicle example
Molecule use providers such as docker or virtualbox to create the target instances to run the playbook against.
The Targets are configured in molecule/molecule.yml
For this example we will use:
- Ubuntu 22.04
- Windows 2019
Run Molecule
From the Hashiqube Cloned repo do:
cd ansible/roles/ansible-role-example-role && ./run.sh
Ansible Role Example Role
An example Ansible Role that you can use which covers, Red Hat, Centos, Ubuntu, Debian and Windows Targets.
Further reading see: Ansible Role Example Role
Ansible Galaxy Roles
Ansible Galaxy is the Ansible's official community hub for sharing Ansible roles. It is a community and a shared resource hub where people can download roles or Playbooks
To download community roles and playbooks from remote repositories you need a requirements.txt file foe example
- src: 'https://github.com/ansible-lockdown/RHEL8-CIS'
version: '1.3.0'
scm: 'git'
- src: 'https://github.com/ansible-lockdown/RHEL7-CIS'
version: '1.1.0'
scm: 'git'
- src: 'https://github.com/ansible-lockdown/UBUNTU22-CIS'
version: 'main'
scm: 'git'
- src: 'https://github.com/ansible-lockdown/UBUNTU20-CIS'
version: '1.1.0'
scm: 'git'
- src: 'https://github.com/ansible-lockdown/UBUNTU18-CIS'
version: '1.3.0'
scm: 'git'
- src: 'https://github.com/ansible-lockdown/Windows-2016-CIS'
version: '1.2.1'
scm: 'git'
- src: 'https://github.com/ansible-lockdown/Windows-2019-CIS'
version: '1.1.1'
scm: 'git'
- src: 'https://github.com/star3am/ansible-role-win_openssh'
version: 'ssh-playbook-test'
scm: 'git'
- src: 'https://github.com/elastic/ansible-elasticsearch'
version: 'v7.17.0'
scm: 'git'You can then download them by using this command:
ansible-galaxy install -f -r ansible/galaxy/requirements.yml -p ansible/galaxy/roles/
Ansible Role Example Role
About
This is an Ansible Example Role used for training and development
Gotcha's (Sorry!!)
- M1 and M2 Mac Architectures are NOT supported at this stage
- Hyper-V is not supported at this stage
- Your Vagrant version on Windows and in WSL MUST be the same
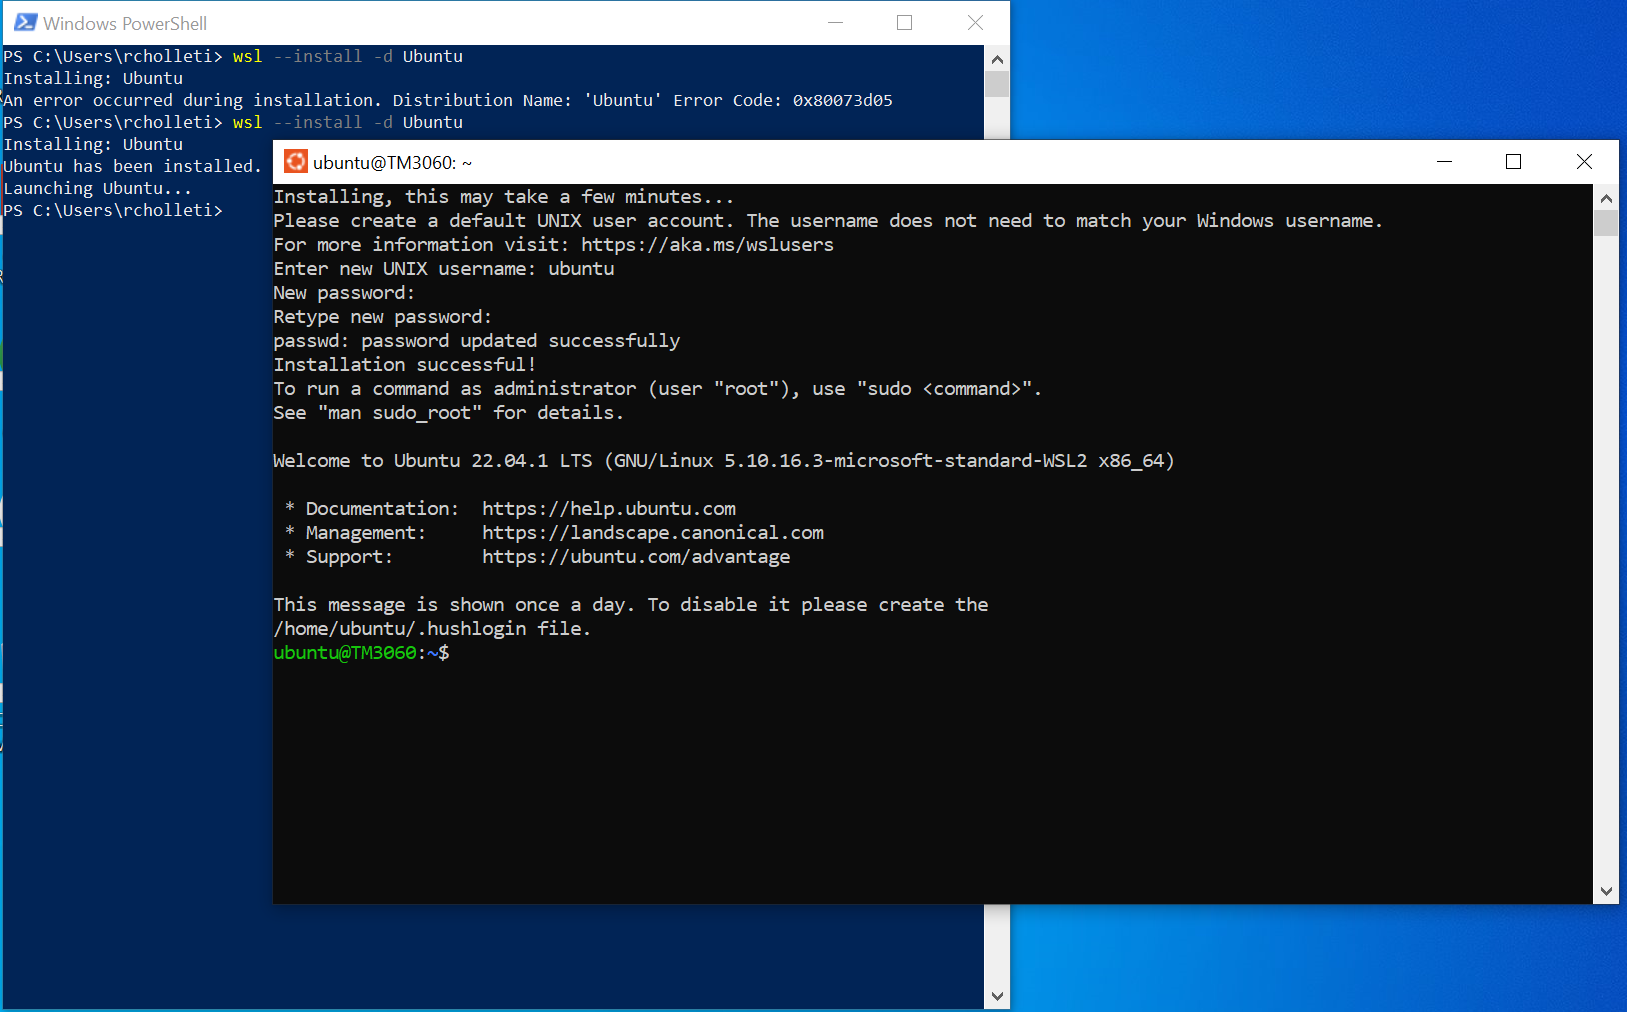
- Installing WSL could give error:
Catastrophic failure
Restart laptop, run this installation command again, and make sure nothing is downloading in the background at the same time when running the command.PS C:\Windows\system32> wsl --install Installing: Windows Subsystem for Linux Catastrophic failure
- WSL Ubuntu Install could give error:
An error occurred during installation. Distribution Name: 'Ubuntu' Error Code: 0x8000ffff
Follow this link: https://askubuntu.com/questions/1434150/wsl-ubuntu-installation-fails-with-the-error-please-restart-wsl-with-the-follo and https://learn.microsoft.com/en-us/windows/wsl/install-manual#step-4---download-the-linux-kernel-update-packagePS C:\WINDOWS\system32> wsl --install -d ubuntu Installing: Ubuntu An error occurred during installation. Distribution Name: 'Ubuntu' Error Code: 0x8000ffff
Note : Run wsl --install -d Ubuntu in non administrative mode in powershell
PS C:\Users\User> wsl --shutdown
PS C:\Users\User> wsl --unregister UbuntuIf you have error when creating python virtual env:
 Close WSL and run
 Restart-Service -Name "LxssManager"as Administrator in Powershell, restart WSL and./run.shagainIf you have error when bringing up VM:
vagrant was unable to communicate with the guest machine within the configured time period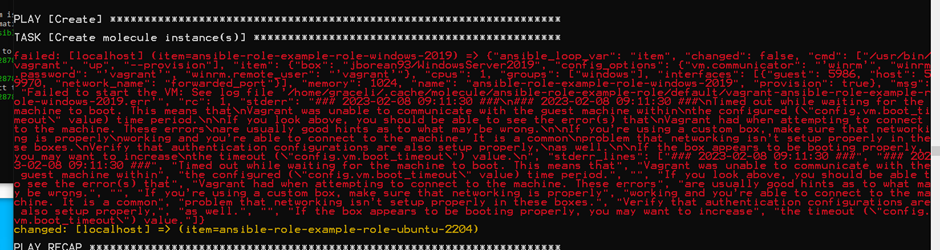 Set WSL Ubuntu Distro to version 1: run
 wsl --set-version Ubuntu 1in powershell, restart WSL and run./run.shagain
Get Started!
![]() IMPORTANT Install these Tools first, before we start actually using Molecule to develop our Ansible Roles
IMPORTANT Install these Tools first, before we start actually using Molecule to develop our Ansible Roles
- Git - https://git-scm.com
- VSCode - https://code.visualstudio.com
- Vagrant - https://www.vagrantup.com
- Virtualbox - https://www.virtualbox.org
- Python and Pip - https://www.python.org
- Windows Subsystem for Linux WSL (Windows Operating System), install as Administrator in Powershell - https://learn.microsoft.com/en-us/windows/wsl/install
- WSL Ubuntu Distro, install as Non-Administrator in Powershell
wsl --install -d Ubuntu - Set WSL Ubuntu Distro to version 1
wsl --set-version Ubuntu 1 - SSHPass - https://www.cyberciti.biz/faq/how-to-install-sshpass-on-macos-os-x/
Supported OSs
The Role supports the following Operating Systems and versions
See: molecule/default/molecule.yml
| Name | Docker | Virtualbox | Hyper-V | Host Arch | Host OS |
|---|---|---|---|---|---|
| Windows 2016 | ✘ | ✓ | ✘ | amd64 | Windows, Mac, Linux |
| Windows 2019 | ✘ | ✓ | ✘ | amd64 | Windows, Mac, Linux |
| Redhat 7.9 | ✘ | ✓ | ✘ | amd64 | Windows, Mac, Linux |
| Redhat 8.3 | ✘ | ✓ | ✘ | amd64 | Windows, Mac, Linux |
| Centos 7.7 | ✘ | ✓ | ✘ | amd64 | Windows, Mac, Linux |
| Centos 8.3 | ✘ | ✓ | ✘ | amd64 | Windows, Mac, Linux |
| Ubuntu 18.04 | ✘ | ✓ | ✘ | amd64 | Windows, Mac, Linux |
| Ubuntu 20.04 | ✘ | ✓ | ✘ | amd64 | Windows, Mac, Linux |
| Ubuntu 22.04 | ✘ | ✓ | ✘ | amd64 | Windows, Mac, Linux |
| Debian 9 | ✘ | ✘ | ✘ | amd64 | Windows, Mac, Linux |
| Debian 10 | ✘ | ✘ | ✘ | amd64 | Windows, Mac, Linux |
Instructions
Here is how you can get up and running quickly, this section is devided into Windows using Windows Subsystem for Linux WSL and Mac OSX (Sorry Intel Mac's only at this stage) and Linux
Linux (Ubuntu recommended)
Install all the Tools you need in the Get Started Section
Install Python
sudo apt update && sudo apt-get install -y python3 python3-pip python3-dev python3-virtualenv python3-venv
sudo update-alternatives --install /usr/bin/python python /usr/bin/python3 1 --force
sudo update-alternatives --install /usr/bin/pip pip /usr/bin/pip3 1 --forceInstall SSHPass program
sudo apt-get install -y sshpassInstall Hashicorp Package Sources
wget -O- https://apt.releases.hashicorp.com/gpg | gpg --dearmor | sudo tee /usr/share/keyrings/hashicorp-archive-keyring.gpg
echo "deb [signed-by=/usr/share/keyrings/hashicorp-archive-keyring.gpg] https://apt.releases.hashicorp.com $(lsb_release -cs) main" | sudo tee /etc/apt/sources.list.d/hashicorp.list
sudo apt update && sudo apt install vagrant
echo 1 > /proc/sys/fs/binfmt_misc/WSLInteropInstall Powershell in Ubuntu on WSL
sudo apt-get install -y wget apt-transport-https software-properties-common
wget -q "https://packages.microsoft.com/config/ubuntu/$(lsb_release -rs)/packages-microsoft-prod.deb"
sudo dpkg -i packages-microsoft-prod.deb
sudo apt-get update
sudo apt-get install -y powershellNow let's run Molecule by going into the source directory where you cloned this repo, usually in Ubuntu on WSL somewhere under /mnt/c/....
and do
./run.sh
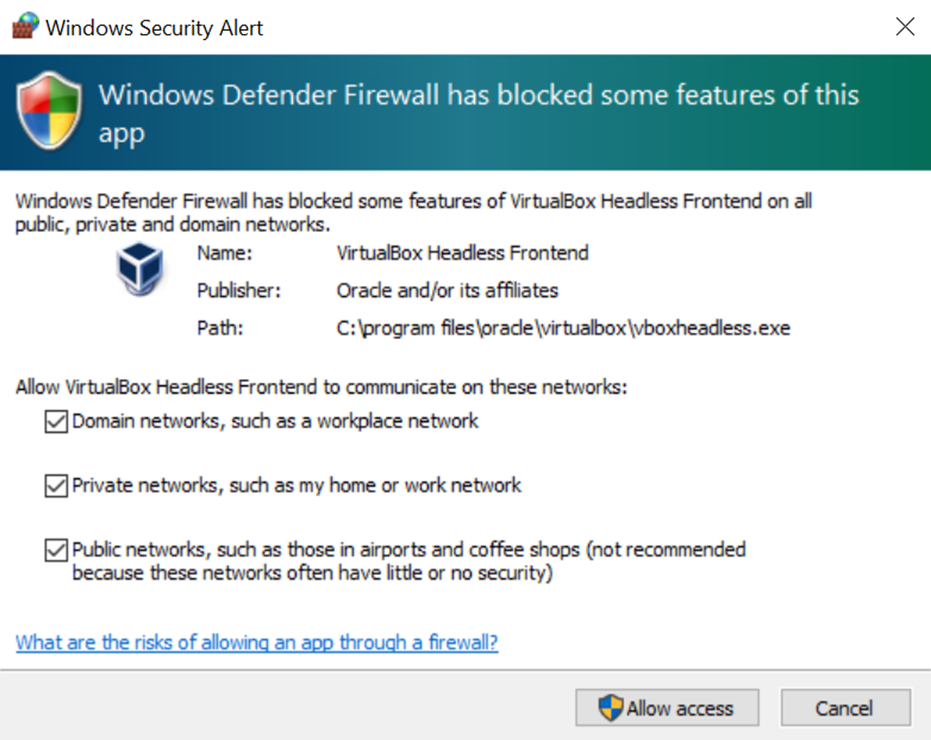
Allow all 3 types of network when set up Firewall for VirtualBox
Mac
Install all the Tools you need in the Get Started Section
Install SSHPass
brew tap esolitos/ipa
brew install esolitos/ipa/sshpass
brew install sshpassNow let's run Molecule by going into the source directory where you cloned this repo
and do
./run.sh
After Molecule bringing up the Ubuntu VM in VirtualBox, to test connection to vagrant in VM, open a new WSL Ubuntu window, and run ssh [email protected] -p 3225 or ssh vagrant@localhost -p 3225. Login with password: vagrant.
Succesful ouput should be as below:
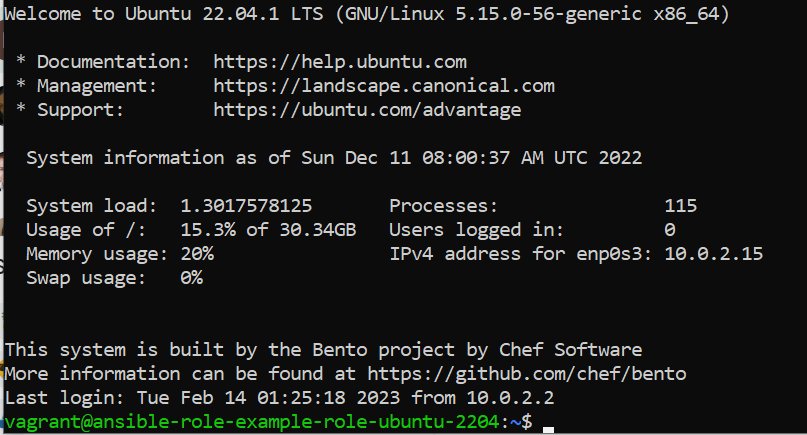
Windows (Ubuntu with WSL)

Ansible Molecule, Mac Intel
Vagrant and Virtualbox

Links
- https://developer.hashicorp.com/vagrant/docs/other/wsl#path-modifications
- https://stackoverflow.com/questions/45375933/vagrant-wsl-cant-access-virtualbox
- https://learn.microsoft.com/en-us/windows/wsl/install
- https://molecule.readthedocs.io/en/latest/getting-started.html
- https://www.ansible.com/hubfs//AnsibleFest%20ATL%20Slide%20Decks/Practical%20Ansible%20Testing%20with%20Molecule.pdf
- https://www.jeffgeerling.com/blog/2018/testing-your-ansible-roles-molecule
- https://app.vagrantup.com/jborean93
- https://github.com/jborean93/packer-windoze
- https://www.ansible.com/
- https://molecule.readthedocs.io/en/latest/
Common Errors
fatal: [ansible-role-example-role-ubuntu-2204]: FAILED! => {"msg": "to use the 'ssh' connection type with passwords or pkcs11_provider, you must install the sshpass program"}Did you install the SSHPass application? See Get Started Section